I know it's been a long time since my latest blog entry, but there simpli wasn't anything to write about.
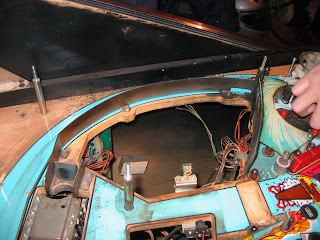
This changed a couple of days ago when I was spending my time at the slovenian coast for the weekend. In the camp where I was spending my nigths, they had a pretty nice example of Stern's Monopoly and on it, after spending a good portion of my vacation playing it, I have accomplished something that I've always strived for. They say that a picture tells more than a 1000 words so here it is:
Checked, I have beaten the high score on a publicly placed pinball :).
Wednesday, 18 August 2010
Sunday, 21 March 2010
Vacation Jackpot
My pinball wizzardish friend find some time this weekend to smash all the records I've hold on the Whitewater machine. He sure gave me something to work on now. This is what I've recorded during his playing:
This is widely agreed by far the coolest effect in any pinball machine ever. If you have any better candidates do not hesitate to write a comment.
He managed to get everything ready for the this during the first ball, with two EBs left and then got stuck with getting the last lock lit (It was the third time around). You can see in the video how he just lost ball 2 and then succeeded with the last ball.
This makes me think how much our pinball playing improved over the years. The first time I owed the Whitwater, I've only seen the Vacation Jackpot once during the period of two years, as now I've seen it a couple of times during just one weekend.
My mission is now known: The Whitewater river master
Sunday, 7 March 2010
I got me a game room
As the title says. Finally, I've managed to obtain a place that will suite my pinball needs once and forall(or at least until I reach the rooms threshold). Due to the fact that I currently own only two pinball machines, this will probably take some time. The "Game room" as I've called it shoud hold 5-6 pinballs with ease. You've seen the rate at what I've been putting the machines together, so this will do it for at least a couple of years.
Thanks mom & dad.
Since a game room with only one game (for now) looked a bit sad, a friend of mine decided to move his Addams family to my place. This was kinda special experience. You don't drive a pinball machine on a trolley on a busy road every day ;):
Our common dream to have our machines at one place has finally came true:
Star Trek (that failed again last week, btw), will probably join them soon.
Saturday, 27 February 2010
Star trek back online
Yesterday, I've managed to get the Star trek back together
As I (and Pinrepair) suspected what needed to be replaced was the Q16 transistor on the auxiliary (8 - driver board).
Here's the picture of the sinfull pcb, right before installing it.
For the first time in history I now have two fully functional pinball machines in my possesion and I wonder where all this will end.
Sunday, 21 February 2010
Bigfoot ramp
I should have put this post together before, but I just couldn't find the time. Here are some pics of how I've fixed the pretty badly broken bigfoot ramp. It took me a whole week to do it, since epoxy glue that I was using takes around 24 hours to dry properly.
This is how it was broken:
My approach was the following:
I've cut out the missing piece from some sort of durable plastics and glued it to some other piece of plastics. This bit came from some old fax machine I found lying around. Here's what came out:
I than glued this bit to the ramp with epoxy. I took me two days, since I did not have enough clamps to do it all at once.
Half way there:
And the result:
I've been using this thing. I just could not find anything stronger on the market.
Luckily, this ramp is almost completely hidden from view, so the artistic impression won't count much, but I bet, this will hold the thing together properly.
Friday, 19 February 2010
Armed and ready
Yesterday I've finished with the playfield. The machine is now in it's full playable form. Needless to say, all the other work stopped for now since everybody want's to play it. Here are some pics of the final steps. There's not that many of them, since I was rushing to get the thing playable ASAP.
Bigfoot ramp installed
Rail attached
Insanity falls is so huge, I had to use a tub to clean it
Installed Insanity falls.
Finished playfield. Boulder garden still missing.
And here's a thing waiting to be done:
Bigfoot ramp installed
Rail attached
Insanity falls is so huge, I had to use a tub to clean it
Installed Insanity falls.
Finished playfield. Boulder garden still missing.
And here's a thing waiting to be done:
Sunday, 14 February 2010
Busy weekend
After a long long time I dedicated almost a whole weekend to the Whitewater again. It all started with my friend finally getting the DMD controller back in order. It's been out since these events. It's been all my fault really. I am almost ashamed to tell, but I put the wrong transistor on the Q6 position. I gotta be more careful the next time.
Anyway, here's the result (taken with the phone):
The working display gave me a true rush, so spent almost entire weekend working on the machine. I did the following.
First, I cleaned, repaired and reinstalled the Disaster drop ramp. I also installed the ramp protector and new lock target in front of it. I could not find the originals, but the green ones from TZ look much better than the orange ones.
Then, I replaced the Hot Foot targets with the new ones, both yellow.
Before:
After:
Then I disassembled the entire upper playfield, cleaned it thoroughly, fixed what was needed and re fitted it to the machine
I know Bigfoots are not supposed to be very neat animals, but mine is. He's ready for a hot date with the Bigfoot lady now.
I also cleaned and re fitted the Spine chiller ramp and installed a protector for it also.
Before cleaning:
...and after cleaning
Lock targets before
and after, with protectors
and this is where I stand at the moment.
I am determined, that I'll get it in the playing condition next weekend. I just hope I'll find the time to go home.
I will report.
Anyway, here's the result (taken with the phone):
The working display gave me a true rush, so spent almost entire weekend working on the machine. I did the following.
First, I cleaned, repaired and reinstalled the Disaster drop ramp. I also installed the ramp protector and new lock target in front of it. I could not find the originals, but the green ones from TZ look much better than the orange ones.
Then, I replaced the Hot Foot targets with the new ones, both yellow.
Before:
After:
Then I disassembled the entire upper playfield, cleaned it thoroughly, fixed what was needed and re fitted it to the machine
I know Bigfoots are not supposed to be very neat animals, but mine is. He's ready for a hot date with the Bigfoot lady now.
I also cleaned and re fitted the Spine chiller ramp and installed a protector for it also.
Before cleaning:
...and after cleaning
Lock targets before
and after, with protectors
and this is where I stand at the moment.
I am determined, that I'll get it in the playing condition next weekend. I just hope I'll find the time to go home.
I will report.
Tuesday, 2 February 2010
Star trek on it's knees
I had an interesting episode with my Star trek the other week.
I was playing a game, when suddenly it started to behave a bit strange. It was popping the balls out during a regular gameplay, it lost the track of number of balls in play an was being all weird in general. A couple of minutes later a coworker came into room and started complaining about something burning. By that time I was already done with my (weird) game and i noticed that the machine was unable to put the balls into proper places. I also smelled something funny so i turned the machine off quickly. I took the backglass down and to my surprise, it was full of smoke!
After panicking a bit I pulled myself together and dug into the problem. It turned out that one of the diverter coils underneath the playfield simply melted.
What followed in the next couple of days was a classic procedure of:
I am now in the process of investigating, what could be wrong. Pinrepair has a whole paragraph dedicated to this exact problem with the Star trek exclusively, thus I have more than enough info on my hand. At a first glance it seems that some problems with the wiring took down some transistor on the auxiliary driver board, but I haven't found the time to check one or the other yet. I will report on the progress.
I was playing a game, when suddenly it started to behave a bit strange. It was popping the balls out during a regular gameplay, it lost the track of number of balls in play an was being all weird in general. A couple of minutes later a coworker came into room and started complaining about something burning. By that time I was already done with my (weird) game and i noticed that the machine was unable to put the balls into proper places. I also smelled something funny so i turned the machine off quickly. I took the backglass down and to my surprise, it was full of smoke!
After panicking a bit I pulled myself together and dug into the problem. It turned out that one of the diverter coils underneath the playfield simply melted.
What followed in the next couple of days was a classic procedure of:
- traveling home
- picking up the needed tools
- finding the replacement coil
- forgetting to pick up some fuses (F103 got burned when the coil failed)
- looking for a place to buy the proper fuses in Ljubljana
- etc....
I am now in the process of investigating, what could be wrong. Pinrepair has a whole paragraph dedicated to this exact problem with the Star trek exclusively, thus I have more than enough info on my hand. At a first glance it seems that some problems with the wiring took down some transistor on the auxiliary driver board, but I haven't found the time to check one or the other yet. I will report on the progress.
Sunday, 3 January 2010
Home for the hollidays
Indeed, I had an opportunity to spent an entire week near to my Whitewater. I wasn't dealing with it for the whole time, but I definitely made same progress. What I did was the following:
#2
#3
#4
This concludes at least a couple of chapters of the cleaning story. I wasn't naming the blogs properly, but I'll try to sum it up here:
Chapter one - stripping down the playfield
Chapter two - cleaning the upper part of the lower playfield
Chapter three - cleaning the bottom part of the lower playfield (here you are)
Chapter four - cleaning the upper playfield (not yet started)
Chapter five - cleaning and re fitting the ramps (not yet started)
Chapter six - cleaning the cabinet (not yet started)
Chapter seven - I bet something will show up (not yet started)
This is how I plan the things will take place, but we'll see what the time brings.
Oh, and happy new year to all.
- Finished the cleaning of the upper part of bottom playfield
- Replace the rubbers with the new ones
- Replaced all the broken flashers
- Cleaned all the bottom pathways and places where the ball is moving underneath the playfield
- Cleaned all the lamps and replaced the broken ones.
- Cleaned the lamp PCB s.
- Cleaned the entire bottom of the lower playfield
- Fixed the broken bounce back target
- Started fixing the disaster drop ramp
- Even took some before and after pics. Here they are:
#2
#3
#4
This concludes at least a couple of chapters of the cleaning story. I wasn't naming the blogs properly, but I'll try to sum it up here:
Chapter one - stripping down the playfield
Chapter two - cleaning the upper part of the lower playfield
Chapter three - cleaning the bottom part of the lower playfield (here you are)
Chapter four - cleaning the upper playfield (not yet started)
Chapter five - cleaning and re fitting the ramps (not yet started)
Chapter six - cleaning the cabinet (not yet started)
Chapter seven - I bet something will show up (not yet started)
This is how I plan the things will take place, but we'll see what the time brings.
Oh, and happy new year to all.
Subscribe to:
Posts (Atom)